Showing posts with label remodel. Show all posts

Tuesday, April 10, 2012

Carpet to Hardwood Flooring


Carpet to Hard Flooring
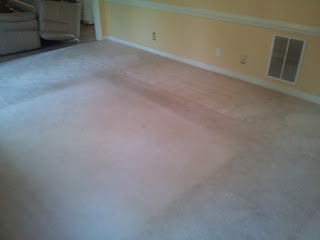
area where rug was is still the original color

When we first bought the house, it had spotless, almost new carpet.  Having 2 dogs and friends constantly in and out of the elements, changed the condition of this once bright fluffy carpet, to matted up stain patches in a matter of months.

The door to the rear deck steps into carpet, and paw prints and the remnants of lost battles to stains were starting to become a norm on the carpet.

To combat the dirt stains, as well as ease some of the cleaning that was needed, almost daily, I decided to install hardwood flooring.


Looking at several options and having installation can make a flooring job quickly climb into the thousands of dollars... I decided to give this a try and save a few bucks.


At the hardware store, the clerk pointed out that the same reason I was going to hardwood, would soon ruin my hardwood floors... dog nails and wood floors don't mix.

After a quick internal bout, I decided to go with "Laminate." It doesn't even sound the same.... takes a bit of the allure from it, but decided on dogproof "PergoMax" in Newland Oak.

First step to the transformation is getting the carpet up. Mine only had one hold-down transition and went pretty easy. I rolled up the carpet, and exposed the padding and tack strips.

Ripped and rolled up the padding in similar fashion to the carpet, and removed the tack strips to prep the surface for the laminate.

Had to make sure to remove ALL staples left behind by the padding. Not doing so can cause bumps or uneven surfaces on the finished floor when the new plank is laid over top.


Clean and vacuum entire surface to pick up dust, as well as anything that may potentially unlevel the finished floor.


Pick a direction for the planks to run (usually the length of a room) and start laying the planks down.

The leader planks in this case needed to have the locking "nose" piece trimmed off to sit flat against the wall.


Quick Note: Make sure to get an installation kit ($20) if you're going to do laminate. The kit comes with squares, spacers and brackets necessary to tighten the planks against each other. Laminate is brittle and you could break the ends without using one of these kits.


Work your way down the wall, clicking the pieces into each other. Once you get to the end of a row, cut your plan to size, and begin the next row with the remaining piece of that plank to avoid excess waste and give the floor and more realistic "wooden" look.

This type of floor does not need to be nailed or glued (unless being used in a kitchen or bathroom, and then for water proofing purposes), and floats on the floor, with gaps on all sides to account for any expansion/warping.

At the end of the day, I spent approximately $700 in materials and about 9 hours of labor over the span of two nights to complete, but the results speak for themselves:


Work all the way down to the end of the room to complete

Finishing strips and thresholds complete the look and maintain the "floating" design of this type of floor

Thursday, February 2, 2012

Quick Note About Pulling Out Kitchen Appliances

One of the first things I did, was move the refrigerator and range out of the kitchen. I was able to do this by myself by getting some furniture sliders under the feet/casters and pushing them along. I did not remove the dishwasher, because it would not come easily come out and I figured there was more to it, and i would eventually get to it.

Icemaker tip:

Make sure that you turn off the water supply to your ice maker, and disconnect the supply hose. Have a towel handy right before you pull the line from the fitting, as water can spurt out. Tape the supply line and power cord to the back of the fridge so that you do not roll over them, while moving the fridge.


Dishwasher Mishap


While laying some of the tile around the dishwasher I decided to pull it out. After tripping the breaker, I tried to pull it out but it would not budge. After some meddling around with it, i removed the kick panel at the bottom and saw that I had bent the pipe that connects the water supply to the dishwasher. I'm not sure why, but the piece of copper tubing used was a cut to length pipe, with no room for any kind of movement.  I turned off the (very old/damaged) hot water valve under the sink, removed the coupling from the fitting, removed the electrical connections (usually hidden in a little box behind the kick plate) and pulled out the dishwasher.


Once the dishwasher is out, remove the coupling for the drain hose, and move out of the way using sliders.


I noticed that water kept leaking from the pipe, although the valve was closed, so I placed a 2 liter bottle to catch the drip, while I worked. I noticed that the leak hadn't stopped and maybe I hadn't tightened the valve fully. As I went to re-tighten the valve, I broke through the seal, and water began to shoot everywhere from the pipe! I shut the water main to the house (located in the crawlspace, at my house) and then had to head back to the store to find a replacement hot-water, 2 way valve (one fitting for the sink, the other for the dishwasher). After a quick change out of the old fitting and replacing with the new one, I was back in business.


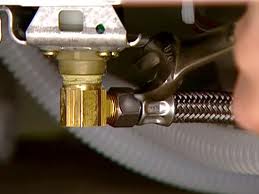
I removed the fitting from the bottom of the dishwasher, cleaned it up and replaced the Teflon tape before re-installing it on the dishwasher. I purchased a stainless braided dishwasher hose and installed it to the fitting, and thread it at the hole where the previous line was fed through, and connected it to the port at the valve under the sink.


This stainless steel line allows more flexibility, and doesn't run the risk of corroding or fracturing. Highly recommend replacing this if you ever pull your dishwasher out.