Tuesday, April 10, 2012

Carpet to Hardwood Flooring


Carpet to Hard Flooring
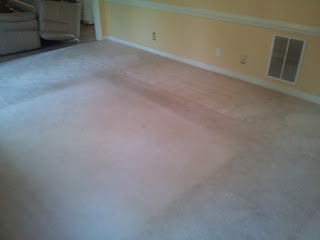
area where rug was is still the original color

When we first bought the house, it had spotless, almost new carpet.  Having 2 dogs and friends constantly in and out of the elements, changed the condition of this once bright fluffy carpet, to matted up stain patches in a matter of months.

The door to the rear deck steps into carpet, and paw prints and the remnants of lost battles to stains were starting to become a norm on the carpet.

To combat the dirt stains, as well as ease some of the cleaning that was needed, almost daily, I decided to install hardwood flooring.


Looking at several options and having installation can make a flooring job quickly climb into the thousands of dollars... I decided to give this a try and save a few bucks.


At the hardware store, the clerk pointed out that the same reason I was going to hardwood, would soon ruin my hardwood floors... dog nails and wood floors don't mix.

After a quick internal bout, I decided to go with "Laminate." It doesn't even sound the same.... takes a bit of the allure from it, but decided on dogproof "PergoMax" in Newland Oak.

First step to the transformation is getting the carpet up. Mine only had one hold-down transition and went pretty easy. I rolled up the carpet, and exposed the padding and tack strips.

Ripped and rolled up the padding in similar fashion to the carpet, and removed the tack strips to prep the surface for the laminate.

Had to make sure to remove ALL staples left behind by the padding. Not doing so can cause bumps or uneven surfaces on the finished floor when the new plank is laid over top.


Clean and vacuum entire surface to pick up dust, as well as anything that may potentially unlevel the finished floor.


Pick a direction for the planks to run (usually the length of a room) and start laying the planks down.

The leader planks in this case needed to have the locking "nose" piece trimmed off to sit flat against the wall.


Quick Note: Make sure to get an installation kit ($20) if you're going to do laminate. The kit comes with squares, spacers and brackets necessary to tighten the planks against each other. Laminate is brittle and you could break the ends without using one of these kits.


Work your way down the wall, clicking the pieces into each other. Once you get to the end of a row, cut your plan to size, and begin the next row with the remaining piece of that plank to avoid excess waste and give the floor and more realistic "wooden" look.

This type of floor does not need to be nailed or glued (unless being used in a kitchen or bathroom, and then for water proofing purposes), and floats on the floor, with gaps on all sides to account for any expansion/warping.

At the end of the day, I spent approximately $700 in materials and about 9 hours of labor over the span of two nights to complete, but the results speak for themselves:


Work all the way down to the end of the room to complete

Finishing strips and thresholds complete the look and maintain the "floating" design of this type of floor

Thursday, February 9, 2012

Installing an Invisible Fence


One of the main reasons for me moving out to the suburbs, aside from the investment aspect of a home, was to get more room for my dogs to run around and play in. Living in a city apartment can be challenging with 2 big dogs.
Lucas and Ethan, waiting at the vet

However, the home we purchased did not have a fenced-in backyard. In order to have them out enjoying the yard, as quickly (and cost-efficiently) as possible, I decided to opt for the invisible fence.

Selecting a fence/collar

Regular Fence Kit
After a lot of research, I discovered that most invisible fences work the same, regardless of brand. You have an emitter and a receiver collar. There are two main kinds of emitters: wireless and wired.

Wireless systems work by setting a circular perimeter around a "hub" placed somewhere inside the home, and can vary in ranges.

Wired systems, work by emitting the field electro-magnetically from a wire, placed around the perimeter of the space you want the pet to use.

Because of the irregular shape of my property and to avoid reliability or signal issues, i decided to go with the cheaper wired system ($180 vs. $300).

Stubborn Dog Fence Kit


There were 2 kinds of wired fences: a regular one, and one for stubborn dogs. After looking at both packages, you should quickly realize that the stubborn dog set-up just has a different receiver collar ($10 difference between collars purchased separately, $30 dollars difference between the systems).


The additional collar that I used in the system was a "Stubborn Dog" collar, only because it can be reduced to a "audio only" mode of correction, which is helpful for training.


Selecting your area


I decided to give my dogs the entire property to roam and used marking paint to mark the line that needed to be dug out for the wire trough. All 90 degree turns had to be rounded out at the property edges, to avoid interference and soft spots in the fence because of conflicting magnetic fields.

Using a straight edged shovel, I started digging the line out, but it quickly turned into a back breaking task. A third into the yard, and a couple of hours later, I called it quits for the day and decided to go with the mechanical approach.

The next day, using my newly acquired ($75) Black and Decker Hog Edger-Trencher, I was in business at full speed. Using the trenching setting, I was able to dig out the rest of the trench in under 20 minutes.


I used a long flat piece of wood to shove the wire into the tench, in order to avoid cutting it, or sharply bending it, and covered the trench after the wire was placed into it.  When I got to the driveway, I cut a small groove into one of the expansion joints and covered it with caulk to protect it from cars/the elements. Place the included flags as you go, to serve as a visual aid for the dog to recognize and learn the limits of the fence.

In order to connect the perimeter loop to the receiver and allow the dogs to cross over it, the wire must be looped, so that the magnetic fields cancel each other out (minimum 10 loops per foot). This looping can also be used to surround any areas you don't want to give your pet access to (flower/mulch beds, pools, etc.)

Once the system is up and showing continuity, use a test light with the collar to approach the edge of the fence. The test light should glow when the collar is being triggered, and signals that the fence is working properly.


Training!!

Training is important to show your pet the property boundaries. Give the noise from the collar, crossing the flags, or the fence a negative connotation, and walk the line with them to show them the boundary lines.

Operant Conditioning (don't touch the hot stove!) is a pretty fool proof concept, and we have only had one incident of squirrel chasing early on in the training phases After a few encounters with the fence limits, while "unsupervised" (me looking out of the upstairs window), and the early training sessions have taught them that crossing the flags is bad.

Before trusting the fence entirely, your pet should be able to resist crossing the fence for toys, other dogs, people, rodents, and even following you.

Tuesday, February 7, 2012

Thresholds and Shoe Molding

To complete the look of the floor, I needed to add thresholds to the areas where the tile ends. I also decided to do away with the white shoe molding that I removed prior to removing the previous floor.

The previous threshold at the carpet was the gold metal strip kind, and it gave the tile/carpet transition a "cheap" look. I decided to update this look with a wooden strip and also added the same type of threshold at the other transition points.

These transitions are good for when one floor surface is higher than the adjacent surface. In my case, the pile carpet rose much higher than the tile surface, so this was perfect.  For the other (hardwood-tile) transitions I used a threshold with a level bottom.

These strips come in varying lengths and can also be purchased in various wood types and finishes. I opted for the cheaper alternative and decided to go with the unfinished oak, and got a small can of Minwax polyurethane in a walnut finish to complement the color of the tile.

After a quick coating (per the instructions on the can), cut the slats to size. If you need to join two different lengths to join, use a miter block and join using 45 degree seams. This is good to minimize the appearance of the joint, and also allows for expansion/contraction of the wood.

Same procedure (using the miter block) can be used to cut the shoe molding to size and fit along corners to make sure that the molding fit flush on each other.

This small change-out of the shoe molding color dramatically changed the feel of the room, and can be done for around $50-60, counting the miter block, stain, brushes and all materials.

Pictures of the finished product to follow.


Friday, February 3, 2012

Grouting

After finishing laying all of the tile and cutting the edge pieces, the next step was to grout in between the tile. Although spacing and grouting isn't necessary for this type of tile, I wanted to keep the look of traditional tile.

Preparing to Grout

Start off by picking up everything off the floor, and doing a good sweep.

Make sure that you remove ALL of the tiles spacers, this is important if you don't want to end up with something that looks like this:
Remove all tile spacers!!

Once all spacers have been removed, vacuum floor thoroughly to get any dust that may have fallen in the space between the tiles, and make sure you give the floor a quick pass to make sure that no spacers have been missed.

Equipment

One approach to this job is the "icing bag" approach, which can be a bit less messy, and probably should have been the way to go.... but hindsight is 20/20, I went with the more conventional float method

The basics for the grouting job include: Premixed vinyl tile grout, soft grout float, grout sponge (sponge on one side, scouring pad on the other), and a bucket of warm water.

Apply the grout mixture with the float at a 45 degree angle to pack it into the crack, then use the float edge at 90 degrees to level the grout. This process allows you to put a considerable amount of grout on the float and "move" it along as you apply it. After leveling the grout, use a damp sponge to remove grout residue from the tile.

If any grout hardens or hazes on the tile, use the scouring pad section on the sponge to clean up before the grout has a chance to harden.

Once the entire floor has been grouted, avoid stepping on it until the grout has had a few hours to set.


Sealing the Grout

Seal grout to avoid stains and prolong life
After the grout has had 48 hours to set, you can now seal the grout. Grout sealer prevents moisture from penetrating the grout and keeps it looking new and clean.

There are two kinds of grout sealers, the spray kind and the roll/brush on kind. The spray on kind is great for smaller tiles and small areas. This kind can also be bought in a version in which the over-spray evaporates, yielding the least amount of clean up possible.

If you have larger tiles, the roll/brush on kind can also be convenient and a quick way to apply grout; while minimizing waste or over-application.

Thursday, February 2, 2012

Quick Note About Pulling Out Kitchen Appliances

One of the first things I did, was move the refrigerator and range out of the kitchen. I was able to do this by myself by getting some furniture sliders under the feet/casters and pushing them along. I did not remove the dishwasher, because it would not come easily come out and I figured there was more to it, and i would eventually get to it.

Icemaker tip:

Make sure that you turn off the water supply to your ice maker, and disconnect the supply hose. Have a towel handy right before you pull the line from the fitting, as water can spurt out. Tape the supply line and power cord to the back of the fridge so that you do not roll over them, while moving the fridge.


Dishwasher Mishap


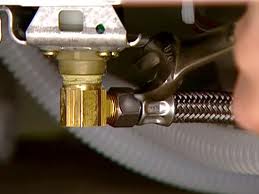
While laying some of the tile around the dishwasher I decided to pull it out. After tripping the breaker, I tried to pull it out but it would not budge. After some meddling around with it, i removed the kick panel at the bottom and saw that I had bent the pipe that connects the water supply to the dishwasher. I'm not sure why, but the piece of copper tubing used was a cut to length pipe, with no room for any kind of movement.  I turned off the (very old/damaged) hot water valve under the sink, removed the coupling from the fitting, removed the electrical connections (usually hidden in a little box behind the kick plate) and pulled out the dishwasher.


Once the dishwasher is out, remove the coupling for the drain hose, and move out of the way using sliders.


I noticed that water kept leaking from the pipe, although the valve was closed, so I placed a 2 liter bottle to catch the drip, while I worked. I noticed that the leak hadn't stopped and maybe I hadn't tightened the valve fully. As I went to re-tighten the valve, I broke through the seal, and water began to shoot everywhere from the pipe! I shut the water main to the house (located in the crawlspace, at my house) and then had to head back to the store to find a replacement hot-water, 2 way valve (one fitting for the sink, the other for the dishwasher). After a quick change out of the old fitting and replacing with the new one, I was back in business.


I removed the fitting from the bottom of the dishwasher, cleaned it up and replaced the Teflon tape before re-installing it on the dishwasher. I purchased a stainless braided dishwasher hose and installed it to the fitting, and thread it at the hole where the previous line was fed through, and connected it to the port at the valve under the sink.


This stainless steel line allows more flexibility, and doesn't run the risk of corroding or fracturing. Highly recommend replacing this if you ever pull your dishwasher out.


Laminate to Tile Installation Part 2

Finishing the Surface

After all of the surface prep work was completed, you have to prep the surface in accordance with the type of tile you are using. For vinyl tile, it is recommended to use lay a latex primer for better adhesion to the sub-floor. I went with this one from my local hardware store:


The latex primer can be applied full strength, or mixed depending on the condition (amount of cleaning done to floor) of the sub-floor. I used a 5 gal. container, a "roller tray" (that can be mounted to the edge of he paint bucket), and a 6 inch high density foam roller attached to a broom handle for comfort.
Putting down the latex primer

The set time for the primer is approximately 2 hours, before tile can be laid down.


Putting Down the Tile

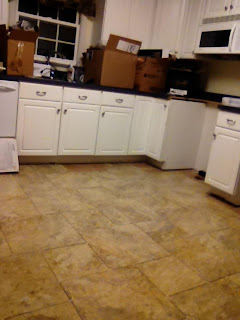
Once your surface is ready, hopefully you have your tile and pattern chosen. I chose to go with a "Crushed Shell" tile color, and an offset pattern using 18" and 12" tiles. 
I wanted to give the floor the look of "real" tile by grouting between the tiles, so i go a bag of "X" tile spacers to set between the tiles to ensure consistent spacing. 

I quickly realized that my spacers were not well suited to my pattern, and I found myself turning the little X's into little T's in order to properly space the tiles.


What I should have gotten
                                                     
Once I laid a couple of tiles (with the backing still on) to verify the pattern and spacer fit, I went against standard convention of drawing lines and figuring out the center of the room, etc.... and just went and picked and edge and lay a tile down. My reasoning for this was my offset pattern would change and there really wasn't any advantage that I could see.

To lay the tile, just peel the backing back and place the tile down, and make sure that you use consistent even pressure to seal the tile. Vinyl tiles have a specially formulated adhesive that further activates when pressure is applied to it. You could use a rolling pin and bear your body weight, rent a tile roller, or use a roller that requires your body weight. I went with the latter option for about $20.

After about 30 minutes of sitting on the floor tiling and rolling, I torqued it over a bit, and found out it had an unadvertised extensible handle. This extension made it much comfortable to apply pressure using my heel, while standing up; instead of awkwardly trying to push down and roll it back and forth.


I tiled the centers of the room and left any tiles that would need to be cut for the end, but at this point, it was finally starting to look like a real floor:


After all of the middle tiles were down, It was time to start cutting the edges. After trying several methods of sizing/measuring tiles, ended up just using a square to measure the size the tile would need to be, making a pattern from cardboard and then tracing it on the tile using a china marker. Once the pattern was on the tile, a quick check to make sure it looks right and using a utility knife score the hard vinyl side against a straight edge. If scored correctly, the tile should break clean along the score line, and you just need to cut through the paper backing.


Once all of the edge tiles have been cut and placed, it is now time to prepare the floor for grouting.

Wednesday, February 1, 2012

Laminate to Tile Installation Part 1

One of the first things I did upon closing on the purchase of the house was walk in, find a joint seam for the existing (and hideous) blue and white linoleum, and started ripping away.

Existing Floor Removal

One thing I would recommend to anyone about to embark on a flooring project, is to invest in a good pair of cushioned knee pads.... trust me


You can see the first rip (above left) by hand into the linoleum. The first night, I decided the extents of the new floor and using a sharp utility knife, scored lines at the doorways where the linoleum would remain. I then removed the shoe molding, but left the baseboards to allow easier access to the edges of the vinyl.Without much prep, I started the process of cutting slits into the linoleum, and rubbing it with warm water to loosen the adhesive, then pulling it by hand. At about 6 AM, I called it quits and realized that I was probably doing it wrong.

The next morning and after some research, I went to my the hardware store and after asking the "knowledgeable" staff, they pointed me towards a scraper very similar to this:

After several hours of sitting on the floor scraping, it still didn't make sense that it would take as long as it was, so after a few calls to some friends and relatives, and  another trip to the hardware store, I then purchased a stand up floor model scraper 


This model finally yielded the results i was looking for, and allowed me to bear my body weight into it. The hand model became useful for removing anything left behind by the big one; however, it is not the option to start with.

Very warm water, a brush, and a clean cloth were essential in cleaning the adhesive residue, left behind by the scraper, off the sub-floor.

It is important to fill/sand any gouges that may have been cause during the removal of the old flooring so the new vinyl tile does not sink or protrude at those points.

The sub-floor should look like this once the vinyl and all adhesive has been removed